
Modern Advanced Driver-Assistance Systems (ADAS) make India’s roads markedly safer by compensating for human error, but only when their cameras, radars, and ultrasonic units are installed and calibrated with engineering-grade precision. This step-by-step guide distills OEM manuals, government standards, and workshop best practices into an accessible playbook for first-time installers in India’s unique traffic and climate conditions.
Why ADAS Matters in India
India recorded over 150,000 road fatalities in 2022, with driver error accounting for three-quarters of crashes. The Ministry of Road Transport and Highways has therefore proposed mandatory Automatic Emergency Braking (AEBS), Lane Departure Warning (LDWS), and Driver Drowsiness Alert (DDAWS) on heavy vehicles from April 2026. Meanwhile, mainstream passenger cars such as the MG Astor, Mahindra XUV700, and Honda City e:HEV already ship with Level 2 features for as low as ₹14.9 lakh. Precise installation and calibration are thus no longer niche workshop skills—they are a regulatory and business imperative.
Understanding ADAS Levels, Sensors and Mounting Points
SAE J3016 classifies driving automation from Level 0 (no automation) to Level 5 (full autonomy); most Indian cars are Level 1–2, relying on:
- Monocular or stereo windshield cameras for lane recognition, traffic-sign reading, and AEBS.
- 77 GHz millimeter-wave radars behind the grille for Adaptive Cruise Control and Forward Collision Warning.
- Short-range ultrasonic units in bumpers for parking assist and cross-traffic alerts.
- Rear corner radars for Blind-Spot Detection (BSD) and Rear Cross-Traffic Alert.

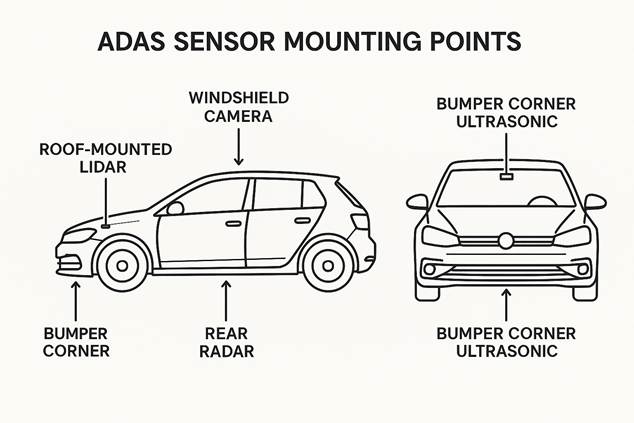
Illustration of typical ADAS sensor mounting locations on an Indian passenger car: windshield camera, front radar, bumper corner ultrasonic, rear radar, and optional roof LiDAR.
Key Takeaway
Mount each sensor exactly where the OEM specifies—usually the windshield frit zone, grille emblem cavity, or bumper corner brackets—to maintain unobstructed fields of view.
Pre-Installation Checklist
- Confirm vehicle compatibility: Some trims lack necessary wiring and CAN gateways; verify via OEM scan tool menus.
- Secure calibrated brackets: Use model-specific windshield camera brackets or radar fascia mounts; generic adhesives create misalignment risk.
- Wheel alignment first: ADAS calibration assumes thrust-line accuracy within ±0.02°; always measure toe, camber, and thrust before sensor work.
- Workshop environment: Flat floor with slope < ±1 mm/m, uniform lighting (avoid sunlight glare), and 5 m × 12 m clear space for target boards.
Physical Mounting Procedures
Windshield Cameras
- Remove the mirror cover and detach the factory bracket with a plastic pry tool.
- Clean the frit area with isopropyl alcohol; avoid glass primers that can distort vision.
- Bond the new bracket using OEM-approved UV adhesive; cure for 15 min at 25°C.
- Clip the camera, connect the LVDS harness, and route the drain tube if equipped with a defog heater.
Front Grille Radar
- Remove the bumper; bolt the radar to the OE carrier plate, ensuring a yaw angle ≤ ±0.1° via a digital angle gauge.
- Torque M6 fasteners to 8 N·m; overtightening warps the bracket and skews the beam.
- Replace bumper; check emblem material is radar-transparent (no chrome backing).
Corner BSD Radars
- Measure bumper height—ideally 50–60 cm from the ground; mark installation marks with calibration cloth and spirit level.
- Attach radar using double-sided VHB tape plus magnets until curing completes (24 h).
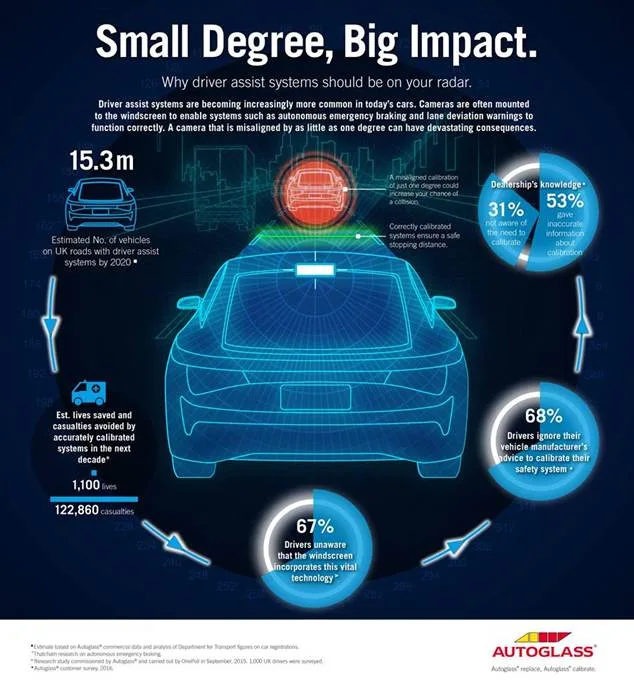
Infographic showing the importance and impact of precise ADAS windscreen calibration and common issues with driver and dealership awareness.
Calibration Fundamentals: Static vs Dynamic
Static calibration uses printed or digital targets in front of a stationary vehicle; dynamic calibration performs road-test learning at 40–80 km/h on lane-marked highways. Most Indian OEMs mandate a two-step approach—static for parameter seeding followed by dynamic confirmation (e.g., Hyundai, Toyota).
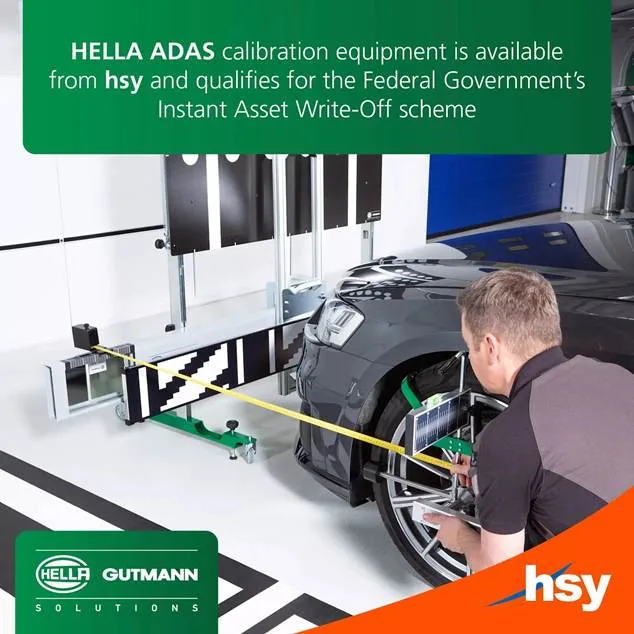
A lot of ADAS calibration equipment set up for sensor calibration in a professional workshop environment is shown on an Indian car.
Even a 1° camera mis-tilt widens stopping distance by 1.5 m at 50 km/h, doubling collision probability. Hence, invest in professional fixtures such as Autel MA600 or Launch ADAS Mobile (₹80,000–₹10 lakh, depending on kit content).
Static Calibration Workflow (Windshield Camera)
- Set the target board centerline to the vehicle thrust line (use wheel clamps and lasers for ±2 mm tolerance).
- Position the board at distance “D” (usually 1.5 m – 2.5 m; reference the service manual).
- Enter OEM scan tool → ADAS → Calibration; follow on-screen prompts until “Calibration Successful.”
- Clear DTCs and save the calibration snapshot.

Dynamic Calibration Workflow (Radar/LKA)
- Connect a battery maintainer ≥ 100 A to prevent voltage drop.
- Drive on straight road with clear lane markings at OEM-specified speed for 10–30 min.
- The scan tool records live target tracking; the process ends when the “Learn Complete” message appears.
Indian Operating Challenges and Mitigations
| Challenge | Impact on Sensors | Mitigation |
| Dust and mud on radar/camera lens | Signal attenuation up to 20 dB ⇒ false targets | Hydrophobic coatings, routine cleaning every fuel fill-up |
| Faded lane markings (IRC 35 non-compliance) | Lane-keep camera loses reference | Dynamic calibration with machine-learning algorithms tuned for interrupted markings |
| Mixed traffic (bikes, animals) | Algorithm confusion, false braking | Enable “Indian traffic” profiles where offered; keep AEBS sensitivity on “Normal,” not “Early.” |
| Frequent windshield replacements due to stone chips | Recalibration cost ₹3,500–₹8,000 per job | Educate customers on recalibration necessity; bundle with windshield insurance |
Cost of Tools and Service Packages
| Item | Indicative Price (₹) | Notes |
| Portable camera target frame (Launch ADAS Mobile) | 80,000–1,00,000 | Ideal for glass shops |
| Full multi-sensor calibration rig (Autel AS30) | 25–35 lakh | Includes radar, LiDAR, night-vision targets |
| 3-in-1 Radar reflector kit | 4.5 lakh | For ACC and BSD radars |
| OEM factory scan subscription (TechStream, GDS) | 80,000–100,000 | Enables software coding |
| Typical customer calibration (windshield) | 3,500–8,000 | Varies by brand and city |
Maintenance and Re-Calibration Triggers
- Windshield replacement, bumper repair, or suspension work.
- DTCs C1A67, B2A60, U0235, or similar communication faults.
- Steering angle sensor reset after wheel alignment.
- Customer reports of lane-keep drift, phantom braking, or ACC cut-out.
Conclusion
Setting up ADAS hardware on Indian vehicles is no longer optional; it is a critical safety and regulatory requirement. By adhering to OEM mounting specs, precise static/dynamic calibration, and proactive maintenance, workshops can deliver reliable Level 2 functionality even amid India’s dusty roads and chaotic traffic. As regulations tighten and consumer demand climbs, early competence in ADAS installation will differentiate forward-looking garages from the rest of the market.


")